8.4.5 底盘实现_04Arduino端PID控制
上一节最后测试时,电机可能会出现抖动、顿挫的现象,显而易见的这是由于PID参数设置不合理导致的,本节将介绍ros_arduino_bridge中的PID调试,大致流程如下:
- 了解ros_arduino_bridge中PID调试的流程;
- 实现PID调试。
1.ros_arduino_bridge中PID调试源码分析
基本思想:
- 先定义调试频率(周期),并预先设置下一次的结束时刻;
- 当当前时刻大于预设的结束时刻时,即进行PID调试,且重置下一次调试结束时刻
- PID代码在diff_controller中实现,PID的目标值是命令输入的转速,当前转速则是通过读取当前编码器计数再减去上一次调试结束时记录的编码器计数获取;
- 最后输出 PWM
ROSArduinoBridge.ino 中和PID控制相关的变量:
#ifdef USE_BASE
  /* Motor driver function definitions */
  #include "motor_driver.h"

  /* Encoder driver function definitions */
  #include "encoder_driver.h"

  /* PID parameters and functions */
  #include "diff_controller.h"

  /* Run the PID loop at 30 times per second */
  #define PID_RATE           30     // Hz PID调试频率

  /* Convert the rate into an interval */
  const int PID_INTERVAL = 1000 / PID_RATE; // PID调试周期

  /* Track the next time we make a PID calculation */
  unsigned long nextPID = PID_INTERVAL; //PID调试的结束时刻标记

  /* Stop the robot if it hasn't received a movement command
   in this number of milliseconds */
  #define AUTO_STOP_INTERVAL 5000
  long lastMotorCommand = AUTO_STOP_INTERVAL;
#endif
ROSArduinoBridge.ino 的 runCommand()函数中:
#ifdef USE_BASE
  case READ_ENCODERS:
    Serial.print(readEncoder(LEFT));
    Serial.print(" ");
    Serial.println(readEncoder(RIGHT));
    break;
   case RESET_ENCODERS:
    resetEncoders();
    resetPID();
    Serial.println("OK");
    break;
  case MOTOR_SPEEDS: //---------------------------------------------
    /* Reset the auto stop timer */
    lastMotorCommand = millis();
    if (arg1 == 0 && arg2 == 0) {
      setMotorSpeeds(0, 0);
      resetPID();
      moving = 0;
    }
    else moving = 1;
    //设置左右电机目标转速分别为参数1和参数2
    leftPID.TargetTicksPerFrame = arg1;
    rightPID.TargetTicksPerFrame = arg2;
    Serial.println("OK");
    break;
  case UPDATE_PID:
    while ((str = strtok_r(p, ":", &p)) != '\0') {
       pid_args[i] = atoi(str);
       i++;
    }
    Kp = pid_args[0];
    Kd = pid_args[1];
    Ki = pid_args[2];
    Ko = pid_args[3];
    Serial.println("OK");
    break;
#endif
ROSArduinoBridge.ino 的 loop()函数中:
#ifdef USE_BASE
  //如果当前时刻大于 nextPID,那么就执行PID调速,并在 nextPID 上自增一个PID调试周期
  if (millis() > nextPID) {
    updatePID();
    nextPID += PID_INTERVAL;
  }

  // Check to see if we have exceeded the auto-stop interval
  if ((millis() - lastMotorCommand) > AUTO_STOP_INTERVAL) {;
    setMotorSpeeds(0, 0);
    moving = 0;
  }
#endif
diff_controller.h 中的PID调试代码:
/* Functions and type-defs for PID control.

   Taken mostly from Mike Ferguson's ArbotiX code which lives at:

   http://vanadium-ros-pkg.googlecode.com/svn/trunk/arbotix/
*/

/* PID setpoint info For a Motor */
typedef struct {
  double TargetTicksPerFrame;    // target speed in ticks per frame 目标转速
  long Encoder;                  // encoder count 编码器计数
  long PrevEnc;                  // last encoder count 上次的编码器计数

  /*
  * Using previous input (PrevInput) instead of PrevError to avoid derivative kick,
  * see http://brettbeauregard.com/blog/2011/04/improving-the-beginner%E2%80%99s-pid-derivative-kick/
  */
  int PrevInput;                // last input
  //int PrevErr;                   // last error

  /*
  * Using integrated term (ITerm) instead of integrated error (Ierror),
  * to allow tuning changes,
  * see http://brettbeauregard.com/blog/2011/04/improving-the-beginner%E2%80%99s-pid-tuning-changes/
  */
  //int Ierror;
  int ITerm;                    //integrated term

  long output;                    // last motor setting
}
SetPointInfo;

SetPointInfo leftPID, rightPID;

/* PID Parameters */
int Kp = 20;
int Kd = 12;
int Ki = 0;
int Ko = 50;

unsigned char moving = 0; // is the base in motion?

/*
* Initialize PID variables to zero to prevent startup spikes
* when turning PID on to start moving
* In particular, assign both Encoder and PrevEnc the current encoder value
* See http://brettbeauregard.com/blog/2011/04/improving-the-beginner%E2%80%99s-pid-initialization/
* Note that the assumption here is that PID is only turned on
* when going from stop to moving, that's why we can init everything on zero.
*/
void resetPID(){
   leftPID.TargetTicksPerFrame = 0.0;
   leftPID.Encoder = readEncoder(LEFT);
   leftPID.PrevEnc = leftPID.Encoder;
   leftPID.output = 0;
   leftPID.PrevInput = 0;
   leftPID.ITerm = 0;

   rightPID.TargetTicksPerFrame = 0.0;
   rightPID.Encoder = readEncoder(RIGHT);
   rightPID.PrevEnc = rightPID.Encoder;
   rightPID.output = 0;
   rightPID.PrevInput = 0;
   rightPID.ITerm = 0;
}

/* PID routine to compute the next motor commands */
//左右电机具体调试函数
void doPID(SetPointInfo * p) {
  long Perror;
  long output;
  int input;

  //Perror = p->TargetTicksPerFrame - (p->Encoder - p->PrevEnc);
  input = p->Encoder - p->PrevEnc;
  Perror = p->TargetTicksPerFrame - input;

  //根据 input 绘图
  //Serial.println(input);
  /*
  * Avoid derivative kick and allow tuning changes,
  * see http://brettbeauregard.com/blog/2011/04/improving-the-beginner%E2%80%99s-pid-derivative-kick/
  * see http://brettbeauregard.com/blog/2011/04/improving-the-beginner%E2%80%99s-pid-tuning-changes/
  */
  //output = (Kp * Perror + Kd * (Perror - p->PrevErr) + Ki * p->Ierror) / Ko;
  // p->PrevErr = Perror;
  output = (Kp * Perror - Kd * (input - p->PrevInput) + p->ITerm) / Ko;
  p->PrevEnc = p->Encoder;

  output += p->output;
  // Accumulate Integral error *or* Limit output.
  // Stop accumulating when output saturates
  if (output >= MAX_PWM)
    output = MAX_PWM;
  else if (output <= -MAX_PWM)
    output = -MAX_PWM;
  else
  /*
  * allow turning changes, see http://brettbeauregard.com/blog/2011/04/improving-the-beginner%E2%80%99s-pid-tuning-changes/
  */
    p->ITerm += Ki * Perror;

  p->output = output;
  p->PrevInput = input;
}

/* Read the encoder values and call the PID routine */
//PID调试
void updatePID() {
  /* Read the encoders */
  leftPID.Encoder = readEncoder(LEFT);
  rightPID.Encoder = readEncoder(RIGHT);

  /* If we're not moving there is nothing more to do */
  if (!moving){
    /*
    * Reset PIDs once, to prevent startup spikes,
    * see http://brettbeauregard.com/blog/2011/04/improving-the-beginner%E2%80%99s-pid-initialization/
    * PrevInput is considered a good proxy to detect
    * whether reset has already happened
    */
    if (leftPID.PrevInput != 0 || rightPID.PrevInput != 0) resetPID();
    return;
  }

  /* Compute PID update for each motor */
  doPID(&rightPID);
  doPID(&leftPID);

  /* Set the motor speeds accordingly */
  setMotorSpeeds(leftPID.output, rightPID.output);
}
2.PID调试
调试时,需要在 diff_controller.h 中打印 input 的值,然后通过串口绘图器输入命令: m 参数1 参数2,根据绘图结果调试:Kp、Ki和Kd的值。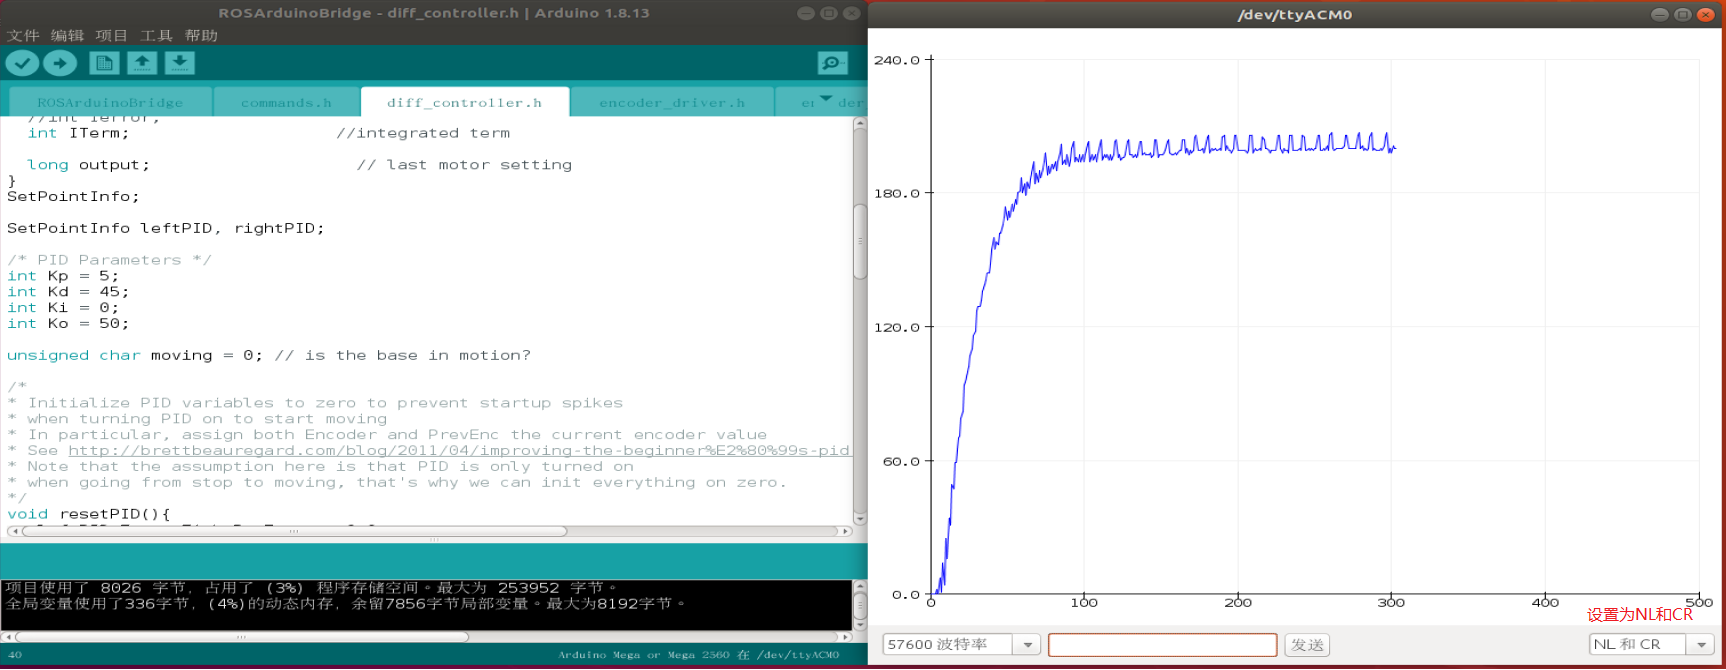
- 调试时,可以先调试单个电机的PID,比如,可以先注释 doPID(&rightPID);
- PID算法不同,即便算法相同,如果参与运算的数据单位不同,都会导致不同的调试结果,不可以直接复用之前的调试结果。
PID调试技巧可以参考之前介绍。